CO 125 sts onto size 5 circlular needles
Join round
K2 P3 for 2.5 inches
Stockinette until piece measures 11 inches or desired length
K2 P3 for 2.5 inches
BO
There you have a beautiful cowl... like the back to school cowl, only slimmer.
The Knitting Club Search
Sunday, 30 September 2012
Wednesday, 12 September 2012
Back to School Cowl
Need a cowl for those back to school shots?
Size 4 Circular Needle
CO 166 stitches
3 inches K2 P3 ribbing
Stockinette stitch until 3 inches away from desired height (I did 10 inches)
3 inches K2 P3 ribbing
Cast off
BTW: the most amazing magnet ever!
Size 4 Circular Needle
CO 166 stitches
3 inches K2 P3 ribbing
Stockinette stitch until 3 inches away from desired height (I did 10 inches)
3 inches K2 P3 ribbing
Cast off
BTW: the most amazing magnet ever!
Saturday, 8 September 2012
Turning Sideways
Firstly, I have spent the last hour trying to flip these pictures so they will face the correct way. IMPOSSIBLE! I flip them, save them and they still face sideways when I put them on the blog.
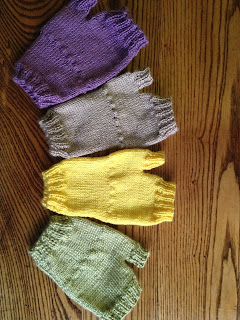
Nonetheless here are some fashion mittens.
I've heard these mittens are all the rage, so I decided to make a few pairs.
Pattern for the beige ones
Using size 2.5 or 3mm needles (Im using my grandmothers needles which dont have any markings on them...so after measuring them I have estimated this size)
You also need a stitch holder (small)
Knit Flat
CO 44 stitches
KKPP rib the next rows until piece measures 1 inch
Next row: K6M1 repeat for entire row
Next rows stockinette stitch for 3 inches (whole piece will measure 4 inches)- alternatively you can make the wrist longer or shorter, the green mittens are only 2 inches stockinette stitch
Next row: K3M1 repeat for entire row
15 rows of stockinette stitch
Next row: Knit 25, then put 18 stitches on stitch holder, put stitch holder in front of work, then knit the rest
Stockinette stitch for 1 inch
KKPP rib for one inch
Bind off
Thumb:
1st row: knit off the stitch marker
2nd row: purl
KKPP for 1 inch
Bind off
Sew the thumb and mitten inside out using mattress stitch
Tada!
Happy Knitting
Subscribe to:
Comments (Atom)
.JPG)
.JPG)
.JPG)
.JPG)
.JPG)


