
Wednesday, 18 September 2013
Tea Towels for Portugal
This past summer I spent most of the month of August in Terceira and Sao Miguel Azores AKA the most beautiful place in the world. I didn't bring much knitting, but I did manage to make several of these beautiful tea towels for Susan and Joe's house in Portugal.


Wednesday, 24 July 2013
Fabulous Knits Part III
Look! fabulous grey hat and a very serious model.


I'm worried this hat maybe lacking in length, but hopefully it works. It acts as a warm hat for winter with a bit of a floppy attitude. The yarn I used is: Queensland Collection: Kathmandu - merino wool, silk and cashmere blend.
Pattern using 5mm short circular needles and dpns
CO 70 stitches
K1P1 for 1.5 inches
Next round: K1M1 (entire round) now 140 stitches
Knit in the round til piece measures 8 inches (if you want more length keep going- next time Im going to go for 9 inches)
Next round: K6 K2tog (entire round)
Next round: K5 K2tog (entire round)
Next round: K4 K2tog (entire round)
Next round: K3 K2tog (entire round)- you may want to switch to DPNs at this point
Next round: K2 K2tog (entire round)
Next round: K1 K2tog (entire round)
Next round: K2tog (entire round)
Keep K2tog until you have 5 stitches- then pull the yarn through with a darning needle
Weave in all ends :)
TA DA
Next fabulous knit: matching leg warmers
Friday, 21 June 2013
Fabulous Knits Part II
Here are some fingerless mittens to match the grey infinity scarf.


I actually attempted these on double pointed needles (dpns).


4 Size 4 dpns
Pattern:
CO 36- divide evenly on 3 dpns
K2P2 for 1.5 inches
Next round: K7 M1 repeat whole round
1.5 inches stkn stitch
Next round: K5 M1 repeat whole round
13 rounds stkn stitch
K23 put 13 stitches on holder K rest of round
Stkn stitch 1.5 inches
K2 P2 1.5 inches
COff
Thumb
Put stitches on hold on two dpns and pick up 5 stitches from mitten on 3rd dpn
2 rows stkn
1 inch K2P2
COff
Weave in all ends :)
Friday, 7 June 2013
Fabulous Knits Part I
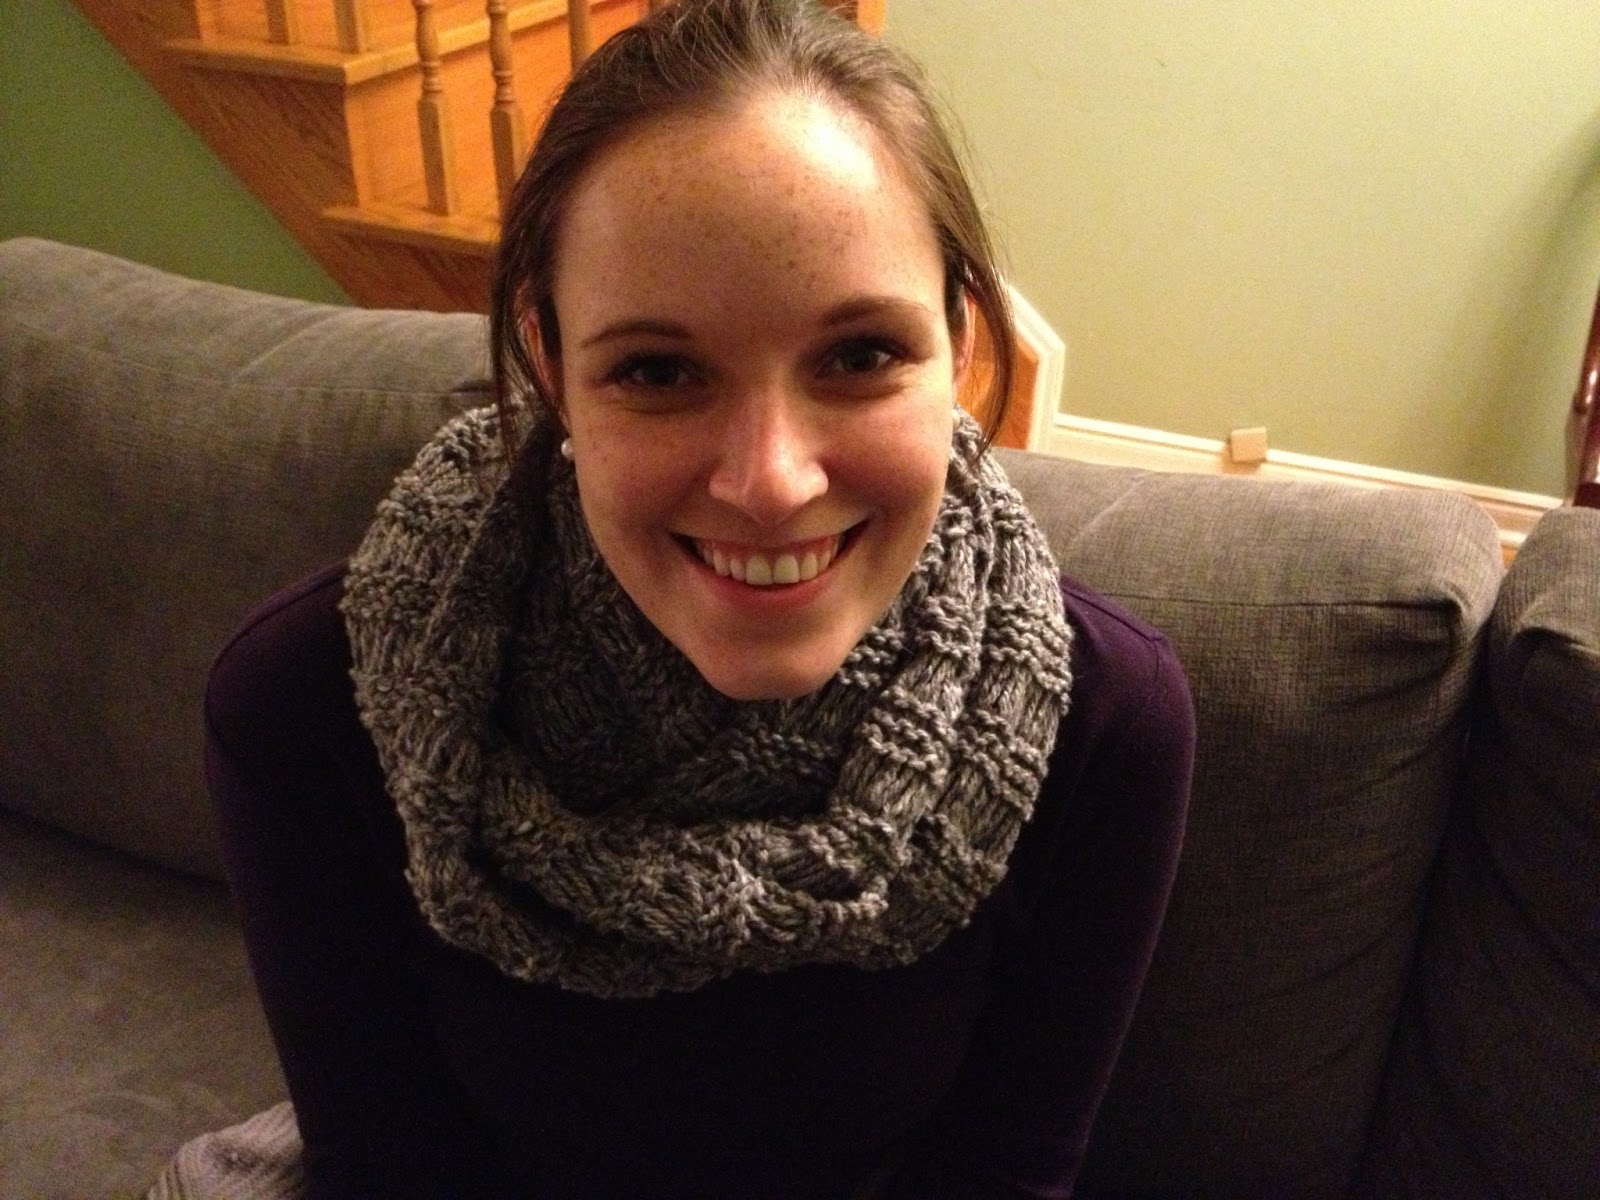
I was recently asked by a friend to make her some matching accessories, she bought the most beautiful yarn and now I get to "make things". This is the first thing I have made: an infinity scarf.


This pattern is easy and knits up pretty fast. I used 5.5mm needles and casted on 30 stitches.
Row 1 K
Row 2 K
Row 3 K
Row 4 K yo2
Row 5 K let each yo drop
Repeat rows 1-5 until desired length is achieved.
I casted off and then sewed the scarf on the ends to create the infinity effect.
Fabulous Knits Part II- seamless fingerless mittens, hopefully I can post them before June is out!

This pattern is easy and knits up pretty fast. I used 5.5mm needles and casted on 30 stitches.
Row 1 K
Row 2 K
Row 3 K
Row 4 K yo2
Row 5 K let each yo drop
Repeat rows 1-5 until desired length is achieved.
I casted off and then sewed the scarf on the ends to create the infinity effect.
Fabulous Knits Part II- seamless fingerless mittens, hopefully I can post them before June is out!
Tuesday, 30 April 2013
Cowls of Color
Hello,
Today I am sneaking in a post for April with two new cowls for some special travelling gifts. I have really enjoyed knitting with Cascade Super Wash Wool and have made it my choice yarn for cowls.
Here is my new modified cowl pattern:
CO123 on size 5 round needles (16 inches), join
K2 P3 for 2.5 inches
K rounds for an additional 5.5 inches
K2 P3 for 2.5 inches
Ta da!
Tres simple!


Today I am sneaking in a post for April with two new cowls for some special travelling gifts. I have really enjoyed knitting with Cascade Super Wash Wool and have made it my choice yarn for cowls.
Here is my new modified cowl pattern:
CO123 on size 5 round needles (16 inches), join
K2 P3 for 2.5 inches
K rounds for an additional 5.5 inches
K2 P3 for 2.5 inches
Ta da!
Tres simple!


Saturday, 23 March 2013
And then there was two...

I have created another pillow for the couch :)
Using 5mm needles
Gauge 6 stitches per inch
CO 68 stitches
PATTERN:
Row 1: *K6P1K1P1K1P1K1* REPEAT FROM *TO* UNTIL END OF THE ROW
Row 2: *P6K1P1K1P1K1P1* REPEAT FROM *TO* UNTIL END OF THE ROW
REPEAT ROWS 1 AND 2 TWICE
NEXT ROW: *P1K1P1K1P1K1K6* REPEAT FROM *TO* UNTIL END OF THE ROW
NEXT ROW: *K1P1K1P1K1P1P6* REPEAT FROM *TO* UNTIL END OF THE ROW
REPEAT THE LAST TWO ROWS TWICE
Continue this patter until the piece measures about 30-31 inches
Mattress stitch the sides of the pillow
Put pillow filling inside and then stitch up the top with your best mattress stitch!
Wednesday, 6 March 2013
Couto's Calgary Cowl
Lucas and Christopher made the trip to Calgary in February to visit their brother and NEW WIFE (congrats).
.JPG)
.JPG)
Lucas requested a BIG cowl to wear while skiing.
I took my skinny cowl and CO 120 stitches on a size 5 needles and knit my heart out. I knit 1/2 of the cowl the day before they left in 4 hours.
.JPG)
.JPG)
Sunday, 24 February 2013
Selfish hat knitting
I made another hat for me! After my last hat adventure I decided I needed a warmer hat. This simple hat is easy to make and is super comfortable.
.JPG)
.JPG)
Pattern
Chunky yarn (I used charisma from Michael's)
Size 5mm short circular needles
1. CO70
2. K1P1 rib for 2 inches
3. Stockinette stitch for 8 rounds
4. Purl one round
5. Repeat steps 3 and 4 until piece measures 7.5 inches
6. Decrease row: K6 K2tog
7. Decrease row: K5 K2tog
8. Decrease row: K4 K2tog
9. Decrease row: K3 K2tog
10. Switch onto DPNS K2 K2tog
11. K1 K2tog
12. K2tog
13. Use darn needle to pull yarn through remaining stitches
14. Weave in loose ends
15. Make a pom pom and attach to top How to make a pom pom: http://www.helloknitty.com/pdfs/pompom.pdf
.JPG)
.JPG)
Monday, 11 February 2013
My Patchwork Hat II
.JPG)
Dear Readers,
Happy early Valentine's Day!
I have recently knitted myself a beanie hat with left over scraps of my favorite yarns.I did this last year on boxing day after all the Christmas knitting, however I lost that hat! He is the new and improved patchwork hat.
Yarn Layers:
1. Green- Cascade Superwash, from a knitted scarf I sold before Christmas
2. Navy- South Pacific Cotton from the double Andalusian scarf I made and kept
3. Ginger- Madeline Tosh from the recently knitted cowl for ME!
4. Grey- South Pacific Cotton from the double Andalusian scarf I made and sold
5. Dark Grey- from a vest I knitted last year!
.JPG)

Wednesday, 30 January 2013
Newsboy Part 1
This is my first attempt at a Newsboy like hat with brim :). Check it out.
 Thoughts:I think the brim is a little wide and the back should be a little longer but its a good first attmpt.
I'm not going to post the pattern as I have not perfected it... but I will post the link for a ravelry pattern which I used to start my hat. The pattern requires worsted weight yarn and is for an adult. My hat is for a 10 year old girl and I used chunky wool to match a scarf :).
Happy Knitting.

I'm not going to post the pattern as I have not perfected it... but I will post the link for a ravelry pattern which I used to start my hat. The pattern requires worsted weight yarn and is for an adult. My hat is for a 10 year old girl and I used chunky wool to match a scarf :).
Happy Knitting.
Sunday, 20 January 2013
The Skinny Cowl
The Skinny Cowl
This YARN is outstanding. It was given to me as a gift from Susan when she visited a yarn store in Canmore, Alberta. They have just started selling Madeline Tosh yarns in Toronto, but not this colour: Madeline Tosh Vintage Ginger (http://madelinetosh.com/store/index.php/yarns/tosh-vintage.html?limit=all)


200g of Madeline Tosh Vintage Ginger (Worsted Weight)
The Pattern:
5mm Round needles CO 96
Join
Garter stitch for 5 rounds
Round 6: Knit all stitches
Round 7: Knit all stitches
Round 8: Knit all stitches
Round 9: Purl two together all around (Ptog)
Round 10: Knit through the front and back of each stitch (Kfb)
Repeat rounds 6-10 14 times (or longer if you want a longer cowl)
Next 3 rounds knit
Garter stitch for 5 rounds
Cast off somewhat loosely.
TADA

Saturday, 12 January 2013
Pillow Time!
Since buying a new couch for our living room, I have decided to knit pillows for it. Here is pillow number 1:
.JPG) Knit in a basket weave with worsted weight yarn on a 16X16 pillow filling (you can get one at walmart for 6$).
Knit in a basket weave with worsted weight yarn on a 16X16 pillow filling (you can get one at walmart for 6$).
Using 5mm needles
Gauge 6 stitches per inch
CO 70 stitches
PATTERN:
Row 1: Knit
Row 2: Purl
Row 3: K2 edge,* K2, P4* continue until end of row K2 edge
Row 4: Knit or purl each stitch as it is
Row 5: K2 edge,* K2, P4* continue until end of row K2 edge
Row 6: Row 4: Knit or purl each stitch as it is
Row 7: Knit
Row 8: Purl
Row 9: K2 edge, P3* K2, P4* continue until 5 stitches remain K5
Row 10: Row 4: Knit or purl each stitch as it is
Row 11: K2 edge, P3* K2, P4* continue until 5 stitches remain K5
Row 12:Row 4: Knit or purl each stitch as it is
Continue this patter until the piece measures about 30-31 inches
Mattress stitch the sides of the pillow
Put pillow filling inside and then stitch up the top with your best mattress stitch!
VOILA!
.JPG) My next pillow will be a dark Red!
My next pillow will be a dark Red!
Happy Knitting
.JPG)
Using 5mm needles
Gauge 6 stitches per inch
CO 70 stitches
PATTERN:
Row 1: Knit
Row 2: Purl
Row 3: K2 edge,* K2, P4* continue until end of row K2 edge
Row 4: Knit or purl each stitch as it is
Row 5: K2 edge,* K2, P4* continue until end of row K2 edge
Row 6: Row 4: Knit or purl each stitch as it is
Row 7: Knit
Row 8: Purl
Row 9: K2 edge, P3* K2, P4* continue until 5 stitches remain K5
Row 10: Row 4: Knit or purl each stitch as it is
Row 11: K2 edge, P3* K2, P4* continue until 5 stitches remain K5
Row 12:Row 4: Knit or purl each stitch as it is
Continue this patter until the piece measures about 30-31 inches
Mattress stitch the sides of the pillow
Put pillow filling inside and then stitch up the top with your best mattress stitch!
VOILA!
.JPG)
Happy Knitting
Wednesday, 26 December 2012
Christmas Hairbands
.JPG)
.JPG)
.JPG)
Sunday, 25 November 2012
The Gauge
A new hat! Only I had to take it out 4 times due to sizing, since I assumed the yarn would have the same gauge as the last yarn that I used for this pattern....I WAS WRONG. You think after taking it out three times I would figure it out. Well I didn't. I would create the hat as per the pattern and then start knitting it up only to realize this is too small, it would only fit a child. I would take it out and add 4 stitches...I really had to add 16. I still think its too small, but the person Im gifting to has a small head, according to Christopher.
.JPG)
Here is a website about why GAUGE is so important.
http://www.earthguild.com/products/knitcroc/marypat/gauge.htm
.JPG)
Sunday, 18 November 2012
Big Yarn
Hello,
.JPG)
.JPG)
So after several fingerless mittens, I have tried a new kind. With chunky yarn and 13mm needles.
Heres what I did:
CO20
1 inch KKPP
Then increase this row: K5 m1 all the way accross
Stockinette Stitch for 3 inches or for desired wrist length
Next row: K3 M1 all the way accross
6 rows stockinette stitch
Next row: K12 put 6 stitches on a holder then K the remaining stitches (the stitches on the holder are for the thumb- leave these stitches in the front)
Knit 1 inch stockinette
K 1 row KKPP
Cast off
Thumb
Knit off holder KKPP
KKPP for one inch
Cast off
Mattress stitch the mitten together :)
.JPG)
.JPG)
Friday, 2 November 2012
Big Lace Part II

Why the difference? Because Charisma decided that this color was DONE (below) so it had to go. When I had more orders in this color, I didnt know what to do. Ta Da!
.JPG)
I am still knitting super slow! I joined the school knitting club- maybe that will help. Christmas is fast approaching and I have four major gifts to knit. Not knitting 35 like last year.
Happy Knitting.
Saturday, 20 October 2012
The perfect finger less mitten
I guess there is always a new reason not to knit... this time, its my class. Teaching grade 7 and taking a course it taking up a lot of time. I still have my small moments to knit, but its the not the same... In my spare time I have been perfecting my finger less mittens. These are my new blue ones and my grade 7 math text book, that I use to teach everyday day with my students :).
.JPG)
.JPG)
.JPG)
The blue mitt is made a little bit looser and longer :)
Knit Flat
Blue
Co 48
Rib KKPP st for 1 inch
K7 m1 all the way across
Stkn for 4 inches
K4 m1 all the way accross
St kn 14 rows
Next row k 25 put 18sts on holder k rest
Stkn st 1 inch
KKPP 1 inch
Bind Off
Thumb
Pick up stiches
2 rows of stkn stitch
one inch KKPP
Bind off
SEW together :)
.JPG)
Sunday, 30 September 2012
Cowl me pretty :)
CO 125 sts onto size 5 circlular needles
Join round
K2 P3 for 2.5 inches
Stockinette until piece measures 11 inches or desired length
K2 P3 for 2.5 inches
BO
There you have a beautiful cowl... like the back to school cowl, only slimmer.
.JPG)
.JPG)
Join round
K2 P3 for 2.5 inches
Stockinette until piece measures 11 inches or desired length
K2 P3 for 2.5 inches
BO
There you have a beautiful cowl... like the back to school cowl, only slimmer.
.JPG)
.JPG)
Wednesday, 12 September 2012
Back to School Cowl
Need a cowl for those back to school shots?
.JPG)
.JPG) Size 4 Circular Needle
Size 4 Circular Needle
CO 166 stitches
3 inches K2 P3 ribbing
Stockinette stitch until 3 inches away from desired height (I did 10 inches)
3 inches K2 P3 ribbing
Cast off
BTW: the most amazing magnet ever!
.JPG)
.JPG)
.JPG)
CO 166 stitches
3 inches K2 P3 ribbing
Stockinette stitch until 3 inches away from desired height (I did 10 inches)
3 inches K2 P3 ribbing
Cast off
BTW: the most amazing magnet ever!
.JPG)
Saturday, 8 September 2012
Turning Sideways
Firstly, I have spent the last hour trying to flip these pictures so they will face the correct way. IMPOSSIBLE! I flip them, save them and they still face sideways when I put them on the blog.
Nonetheless here are some fashion mittens.
I've heard these mittens are all the rage, so I decided to make a few pairs.
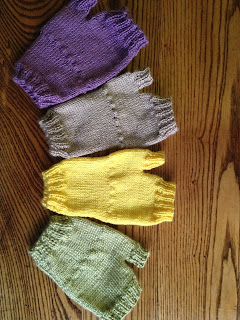


Pattern for the beige ones
Using size 2.5 or 3mm needles (Im using my grandmothers needles which dont have any markings on them...so after measuring them I have estimated this size)
You also need a stitch holder (small)
Knit Flat
CO 44 stitches
KKPP rib the next rows until piece measures 1 inch
Next row: K6M1 repeat for entire row
Next rows stockinette stitch for 3 inches (whole piece will measure 4 inches)- alternatively you can make the wrist longer or shorter, the green mittens are only 2 inches stockinette stitch
Next row: K3M1 repeat for entire row
15 rows of stockinette stitch
Next row: Knit 25, then put 18 stitches on stitch holder, put stitch holder in front of work, then knit the rest
Stockinette stitch for 1 inch
KKPP rib for one inch
Bind off
Thumb:
1st row: knit off the stitch marker
2nd row: purl
KKPP for 1 inch
Bind off
Sew the thumb and mitten inside out using mattress stitch
Tada!
Happy Knitting
Subscribe to:
Posts (Atom)